| Edition | Supported Versions |
|---|---|
| pfSense® Plus | 26.03 |
| pfSense® Community Edition | 2.8.1 |
Every time pfSense® is upgraded on an existing adam:ONE® (v4) instance, a re-install of adam:ONE® v4 is required. From the Diagnostics menu, choose Command Prompt and execute the following:
curl -sS https://dl.adamnet.works/pfsense/install4 | sh -s
Note that theadamone-setup configurescript does not need to be run on a re-install.
For a first-time adam:ONE® installation on pfSense®, follow the steps below:
Requirements
- Operate a version 4-supported pfSense® (see above)
Preparation
-
Store a current system backup (Diagnostics → Backup & Restore → Download Configuration as XML)
-
Communicate a maintenance window to affected users
-
Be able to make an
sshconnection to your pfSense gateway -
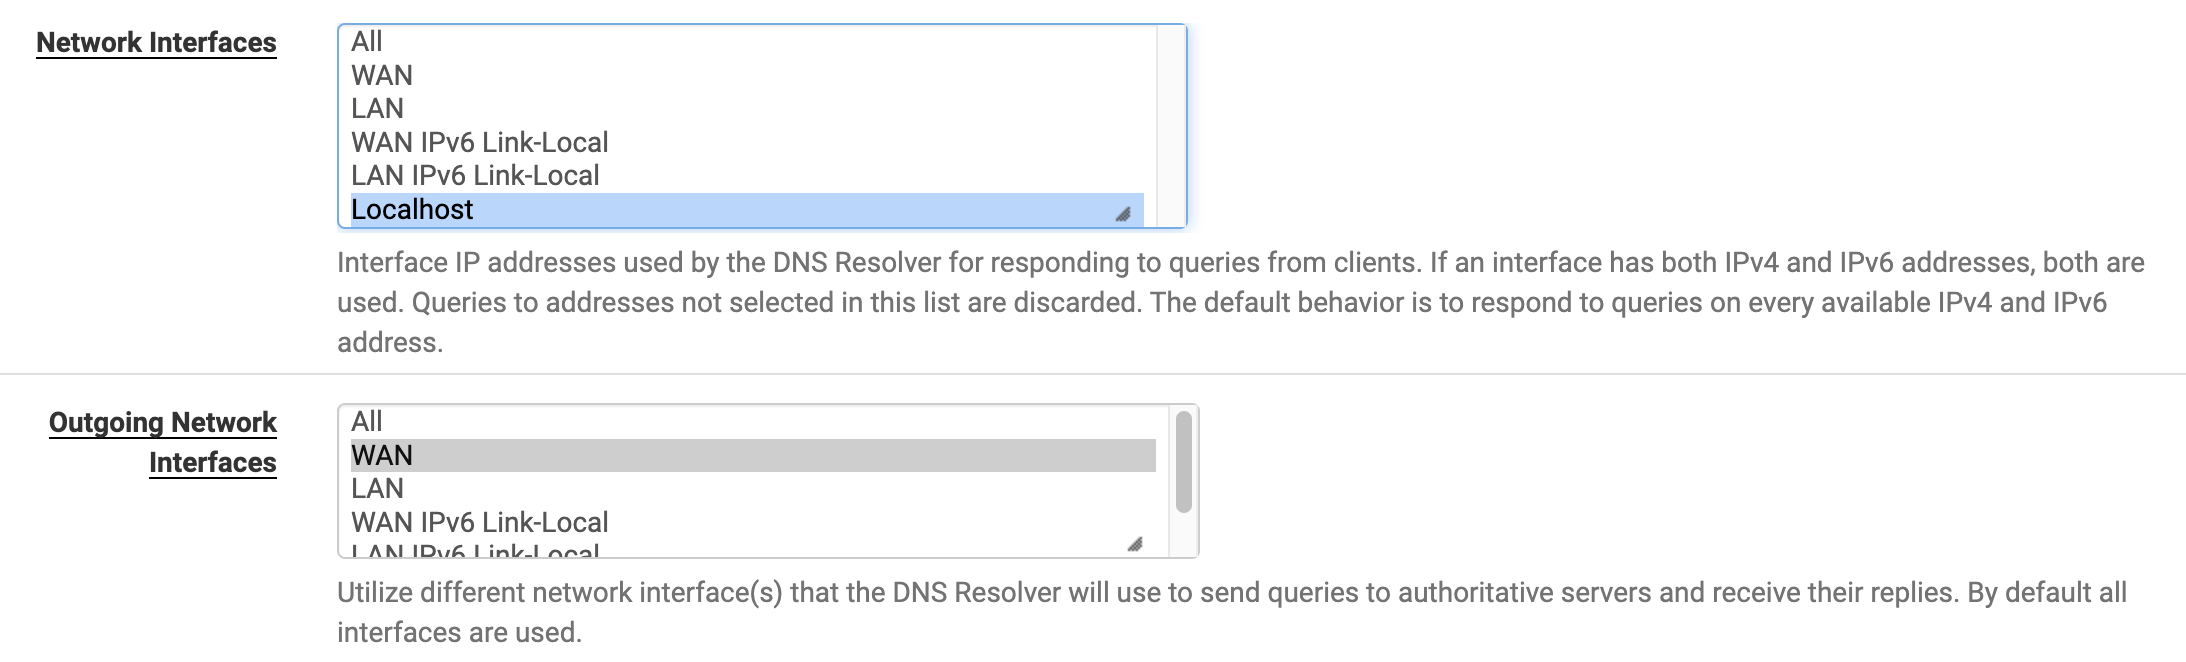
From Services → DNS Resolver, change it to listen only on localhost, and outgoing set only to WAN(s), then Save, Apply Changes
- Disable WebGUI redirect and set your pfSense webConfigurator TCP port to a port other than 443. Set to 20443, for example, at System → Advanced → Admin Access like this:
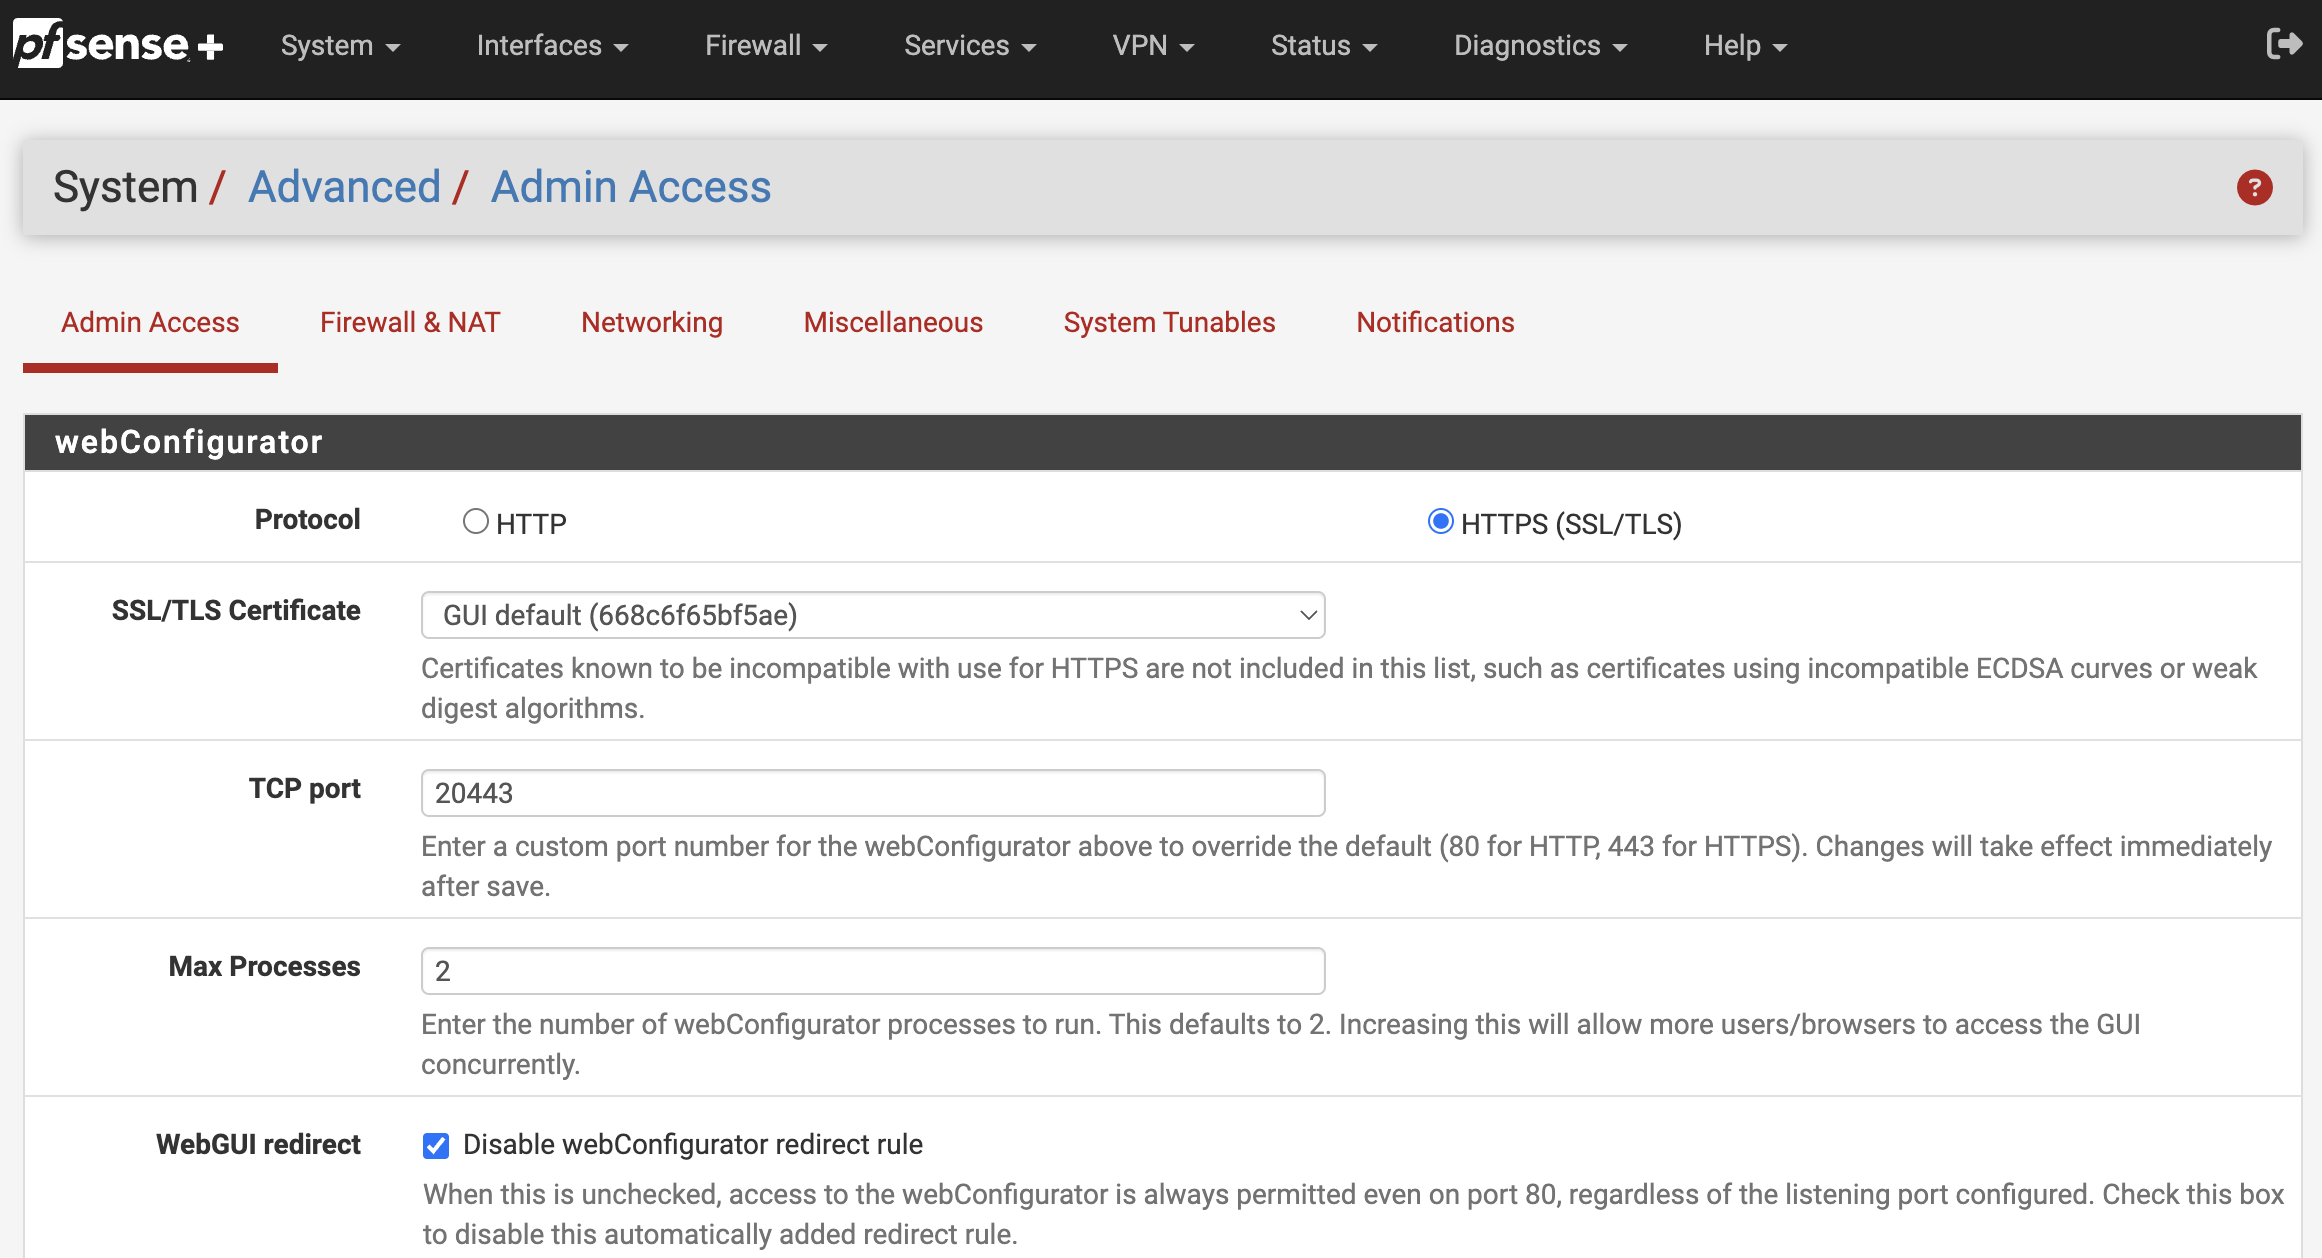
Save changes, and access the webConfigurator at the newly-assigned port.
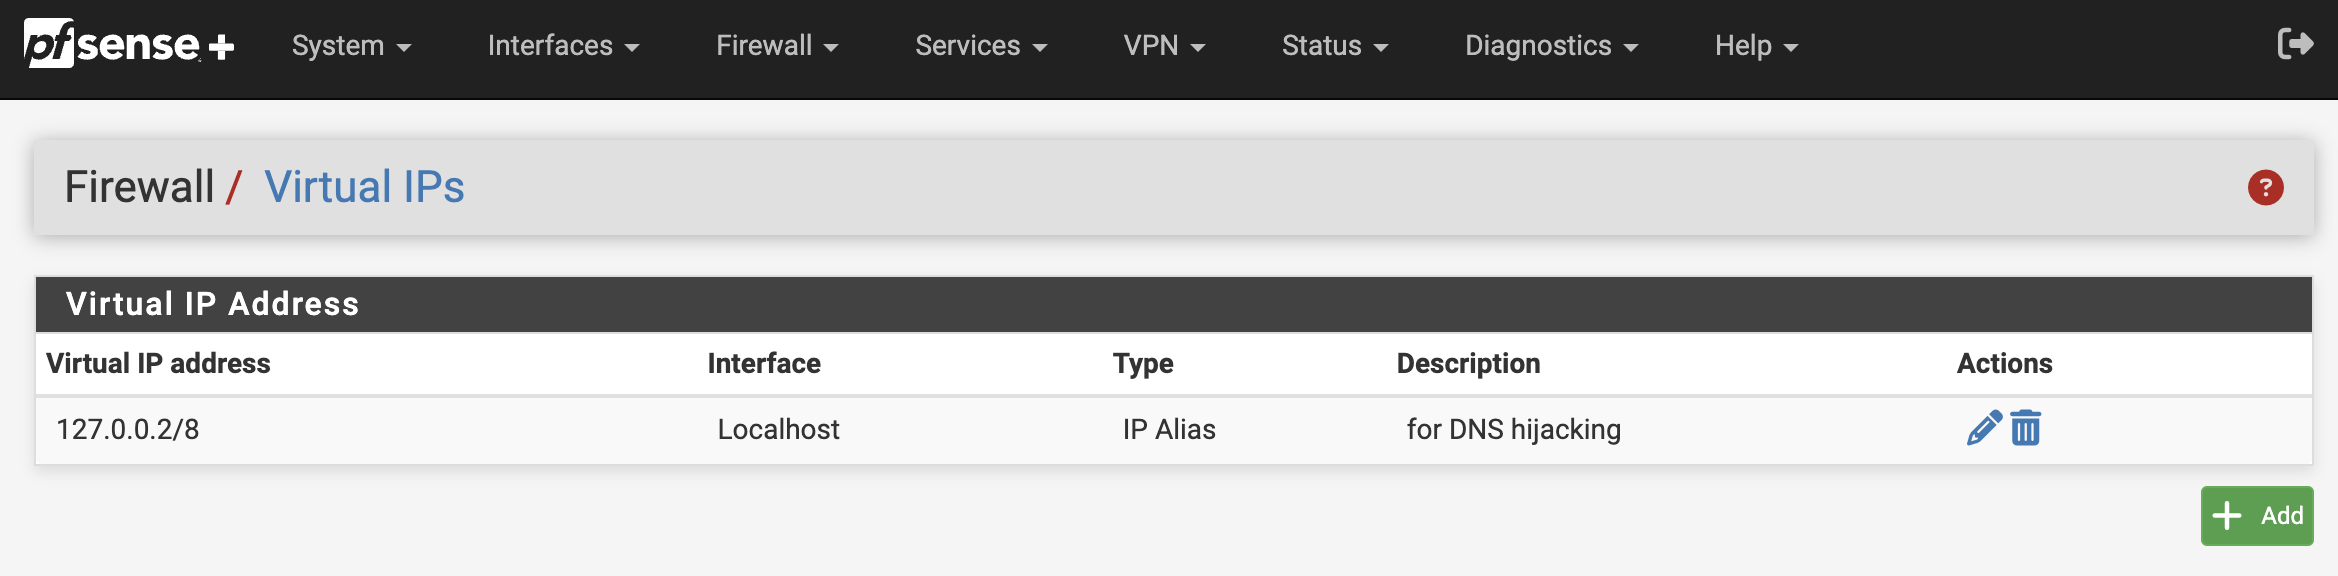
- From Firewall menu choose Virtual IPs. Create a localhost interface alias of
127.0.0.2/8that will be used to hijack/force DNS for internal endpoints referencing public DNS servers. When completed, it should appear like this:
Install version 4
-
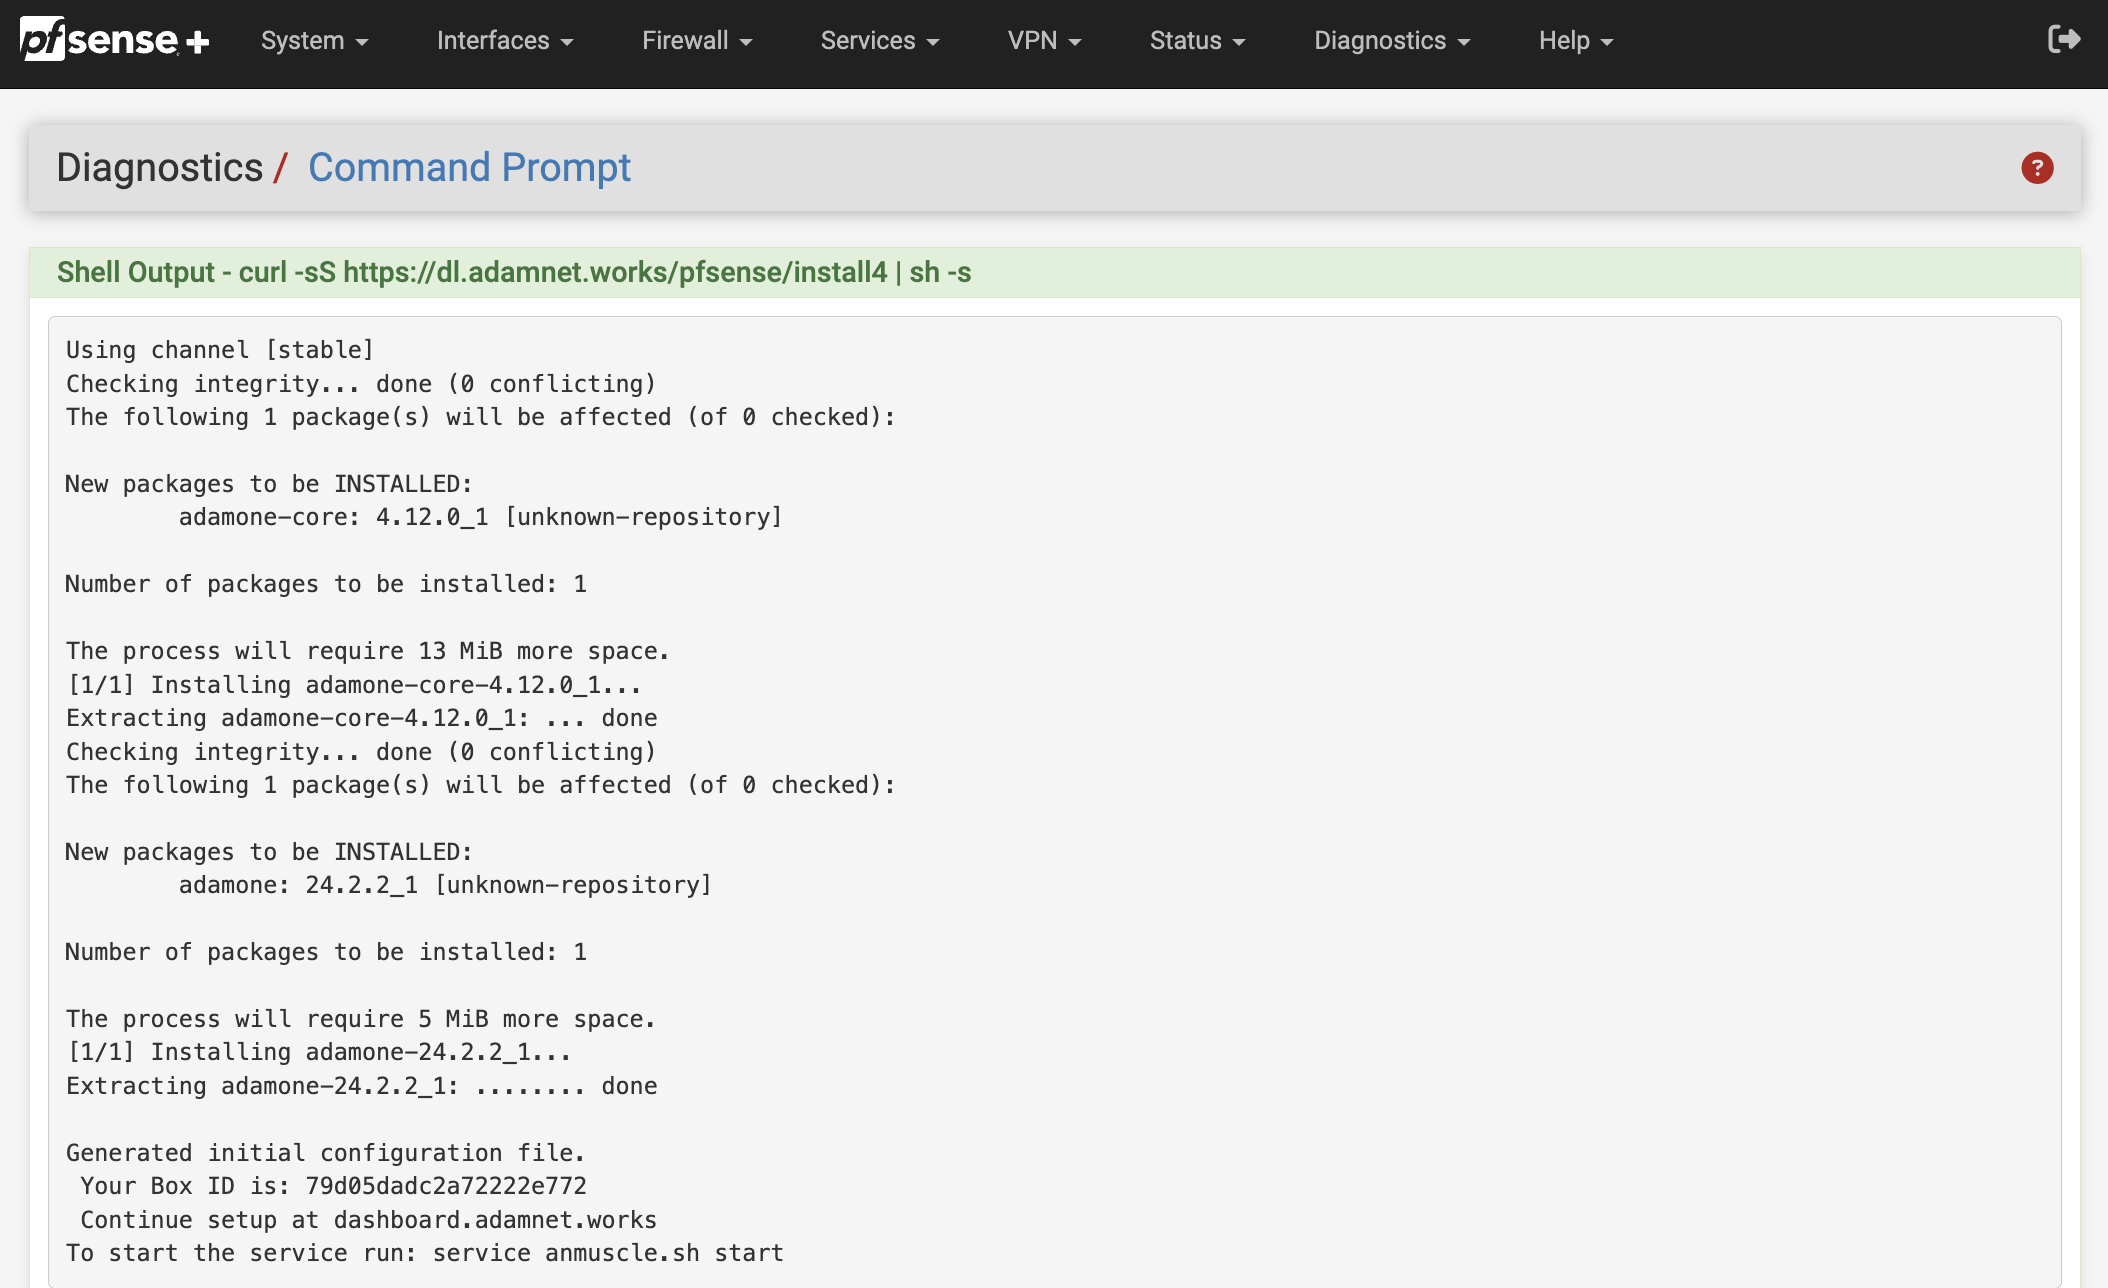
From your ssh session or Diagnostics → Command Prompt menu, run:
curl -sS https://dl.adamnet.works/pfsense/install4 | sh -sYour output should look similar to this:
-
Note your BoxID on the output
-
Register BoxID at dashboard.adamnet.works under Billing Settings
-
The following step is also required and cannot be run from the Diagnostics → Command prompt, it must be done via ssh:
adamone-setup configureIf installing version 4 for the first time, make sure this question is answered yes:
Generate recommended firewall rules in each LAN interface [no]: yesFor all other steps, answer accordingly, an example is shown here:
[24.03-RELEASE][admin@gateway1.site-a.anycorp.io]/root: adamone-setup configure

Available Interfaces:

1 - All (all)
2 - WAN (mvneta2)
3 - *LAN (mvneta1)

Enter the interfaces you would like to set as LAN interfaces separated by a comma, press <ENTER> to skip [3]:

Select a default LAN interface, press <ENTER> to skip [3]:

Set LAN interfaces to: mvneta1
Set Default LAN interface to: mvneta1

Available Interface Addresses:

1 - WAN (10.20.12.162)
2 - *LAN (192.168.1.1)
3 - *127.0.0.2 (for DNS hijacking) (127.0.0.2)
4 - Localhost (127.0.0.1)
5 - Localhost (::1)

Select the addresses you would like adam:ONE to listen on separated by a comma, press <ENTER> to skip [2,3]:

Set DNS listeners to: 192.168.1.1@53,127.0.0.2@53
Set HTTP listeners to: 192.168.1.1@80,127.0.0.2@80

Set a log level (0-6), press <ENTER> to skip [4]: 4
Set log level to: 4

What hour of the day would you like adam:ONE to be automatically updated? Valid options are 0-23 [00]: 03
Setting adam:ONE auto-update cron job to 3:46

Enable automatic cloud backups [yes]:

Generate recommended firewall rules in each LAN interface [no]: yes
Hijack IPv4 DNS to Public Servers [yes]:
Configuring firewall for LAN interfaces
[lan] adam:ONE Allow DoT - creating rule
[lan] adam:ONE Allow DNS - creating rule
[lan] adam:ONE Allow ICMP to gateway - creating rule
[lan] adam:ONE Allow block page and adam1.tools - creating rule
[lan] adam:ONE Allow mDNS for device discovery IP4 - creating rule
[lan] adam:ONE Allow mDNS for device discovery IP6 - creating rule
[lan] adam:ONE Allow NetBIOS names for device discovery - creating rule
[lan] adam:ONE Prevent DNS bypass - creating rule
[lan] adam:ONE Allowed Traffic - creating rule
[lan] adam:ONE Reject Blocked Traffic - Should be last rule - creating rule

############ NOTICES ############
# Services / DHCP Server
ℹ︎ Remember to update the DNS server option in your DHCP service to your adam:ONE router IP
- LAN [Not set]

# System / Advanced -> WebGUI redirect
☑️ Disable webConfigurator redirect rule

# System / Advanced -> TCP port
☑️ TCP port is set to a non-default port

# Services / DNS Resolver
☑️ No DNS conflict issues detected

# Firewall / Rules
⚠️ Rules have been created. Please go review them and Apply Changes. You will want to disable the default allow to any rules.

# Firewall / NAT
⚠️ Hijack rules forcing DNS to adam:ONE have been created, please review your NAT port forwards and Apply Changes.
#################################

Applying configuration... restarting anmuscle service... done.
[24.03-RELEASE][admin@gateway1.site-a.anycorp.io]/root:
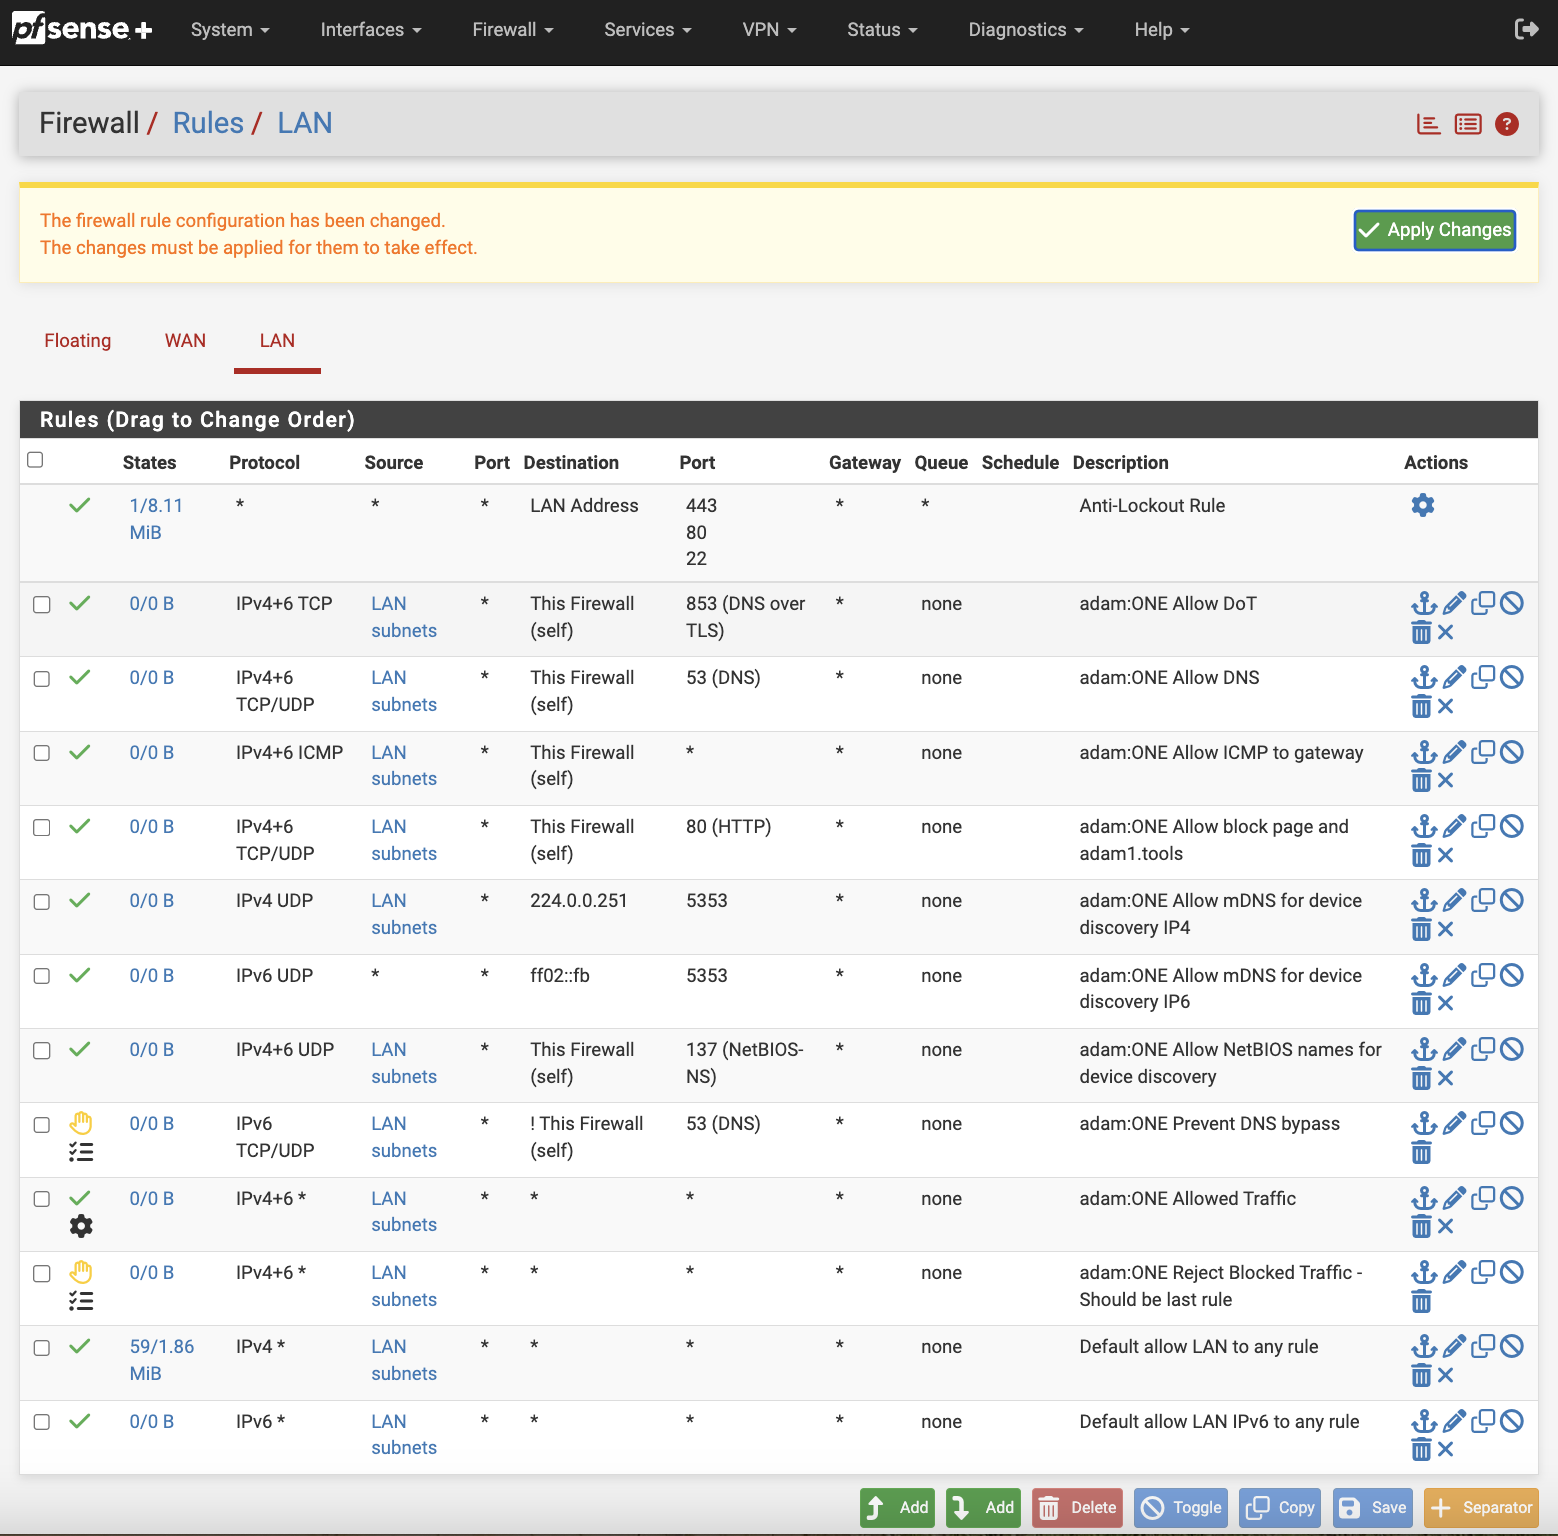
- From the Firewall → Rules menu, apply the Rules changes that were generated with the
adamone-setupscript. Rules will be effective once you click on “Apply Changes”
- Once firewall rule changes have been applied, note the Firewall → NAT and confirm your relevant DNS hijacking rules are in place for 127.0.0.2:

-
Address all other NOTICES shown at the end of your script execution above.
-
From your ssh session or Diagnostics → Command Prompt, review your bindings and make sure you have a
tcp4andudp4binding for each interface on which you offer adam:ONE® service:sockstat | grep anmuscleThe output should be similar to this:
[24.03-RELEASE][admin@gateway1.site-a.anycorp.io]/root: sockstat | grep anmuscle root anmuscle 8775 20 udp4 192.168.1.1:53 *:* root anmuscle 8775 21 tcp4 192.168.1.1:53 *:* root anmuscle 8775 22 udp4 127.0.0.2:53 *:* root anmuscle 8775 23 tcp4 127.0.0.2:53 *:* root anmuscle 8775 24 tcp4 10.20.12.162:3083 34.120.84.240:1883 root anmuscle 8775 25 tcp4 10.20.12.162:40570 34.120.84.240:443 root anmuscle 8775 26 tcp4 192.168.1.1:80 *:* root anmuscle 8775 27 tcp4 127.0.0.2:80 *:* root anmuscle 8775 28 tcp4 192.168.1.1:443 *:* root anmuscle 8775 29 tcp4 127.0.0.2:443 *:* root anmuscle 8775 30 udp4 192.168.1.1:137 *:* [24.03-RELEASE][admin@gateway1.site-a.anycorp.io]/root: -
Confirm these specific bindings are present for each LAN and CARP interface. If they’re missing, DNS Resolver might still be bound to the LAN interface(s):
root anmuscle 8775 20 udp4 192.168.1.1:53 *:* root anmuscle 8775 21 tcp4 192.168.1.1:53 *:* -
Confirm these specific bindings are present for 127.0.0.2 so that non-local DNS usage is hijacked and answered by policy:
root     anmuscle     8775 22  udp4   127.0.0.2:53          *:*
root     anmuscle     8775 23  tcp4   127.0.0.2:53          *:*
Review your rules
In the above sample screenshot, the original “Default allow LAN” will not be matched any longer since the “adam:ONE Reject Blocked Traffic” rule will block any unmatched traffic above.
In the event you need firewall rules to be processed outside of adam:ONE® they must appear above “adam:ONE Reject Blocked Traffic”.
For a full review of the purpose of each rule, with some historical context, see Understanding pfSense unified firewall rules .
Recommended additional steps:
- Learn about Enablers: The complete guide to enabling DTTS® on your adam:ONE® gateway
- Learn about and use DNSharmony as a way to aggregate publicly-available threat intelligence
- Follow DNS best practices when combining with unbound (DNS Resolver) -
- We also recommend strongly to follow our NTP best practices
Common problems and solutions
No Internet access, dashboard shows offline
- Check your device status at dashboard.adamnet.works
- Service checks/start/restart:
service anmuscle.sh status(to see status)service anmuscle.sh stop(to stop the service)service anmuscle.sh start(to start the service)service anmuscle.sh restart(to restart the service)
- Eliminate port 53 binding conflicts if another service owns port 53
- If intending to run DTTS, ensure that the dashboard → Advanced → Enable DTTS is active
- Run
adamone-setup boxidto confirm your BoxID is the same as registered on the dashboard
Uninstall
-
To remove adam:ONE® v4, you can run this command in an ssh session:
adamone-uninstallNote, however, that the uninstall process will not remove any firewall rules created during the
adamone-setup configurescript.
*pfSense+ 25.11 and later (ARM support only)
-
Update on 2026-01-29
-
We have published a bug report to redmine and any pfSense+ 25.11 and later support on AMD/Intel will depend on this bug being fixed